Next week is September’s Garment Sewing Group meetings-
September Garment Sewing Group
Wednesday, September 10, Lakes Makerie, Mpls
Thursday, September 11, Creative Sewing, Apple Valley/Fabric Swap
Saturday, September 13, Ginny’s Fine Fabrics, Rochester
Can’t wait to see what our change in weather has inspired!!
I’ve been trying to finish some projects in my studio-
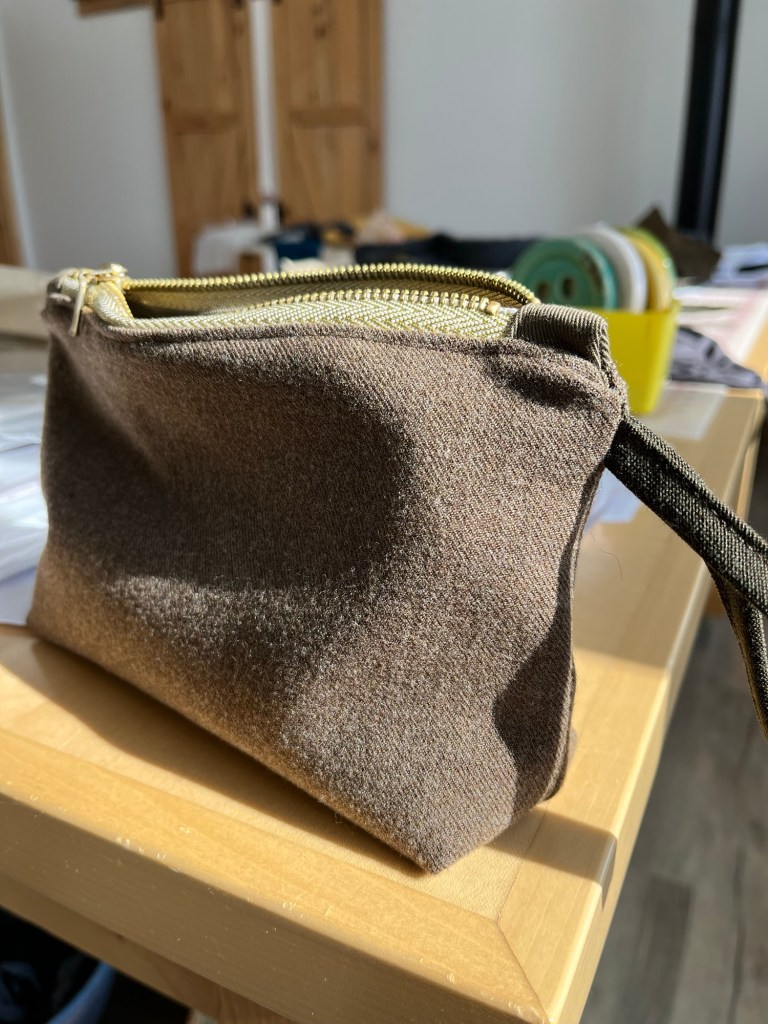
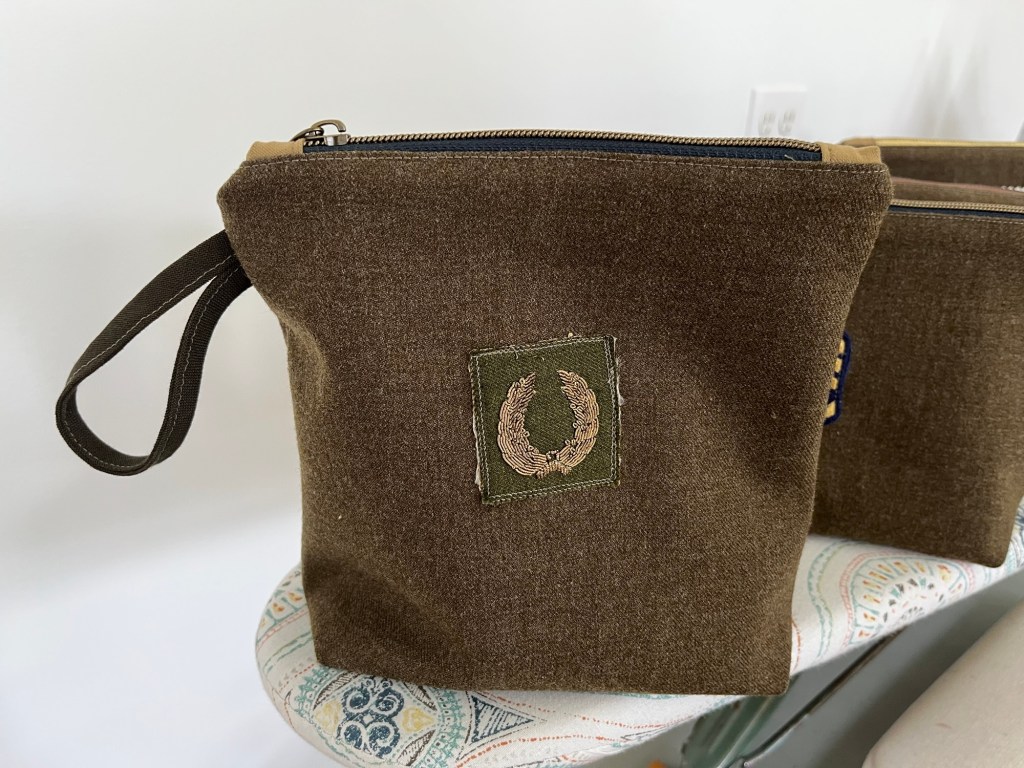
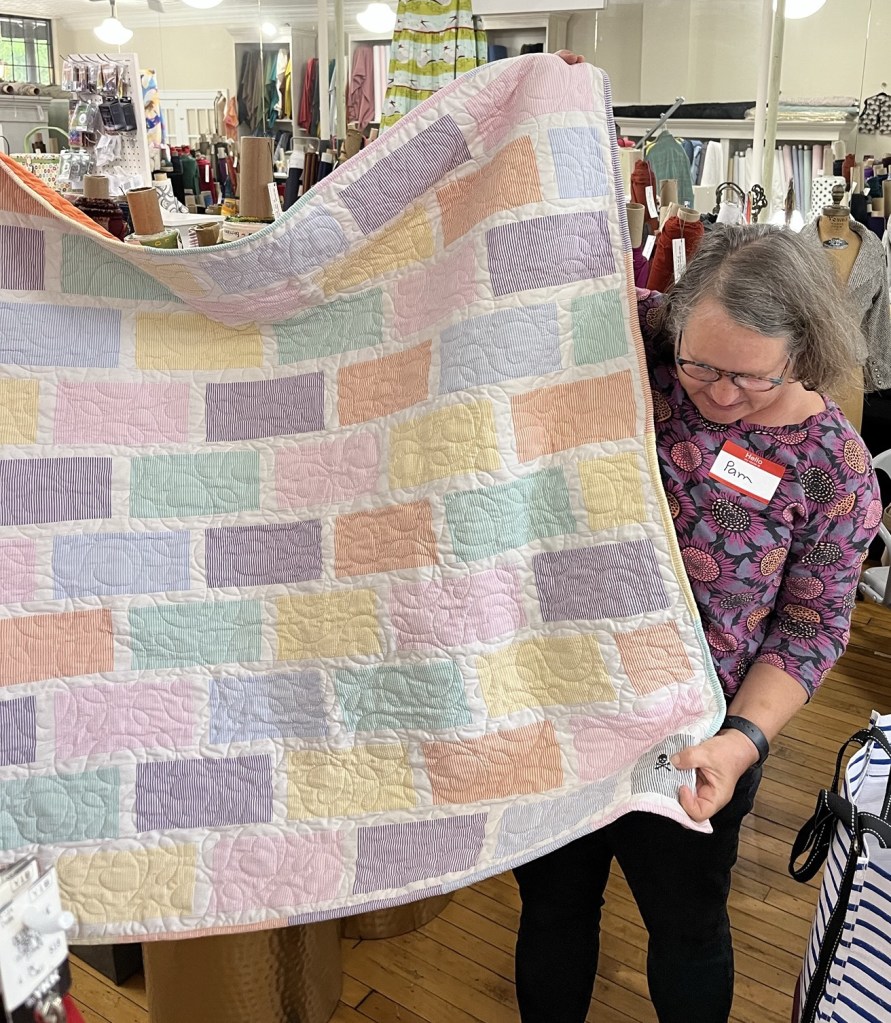
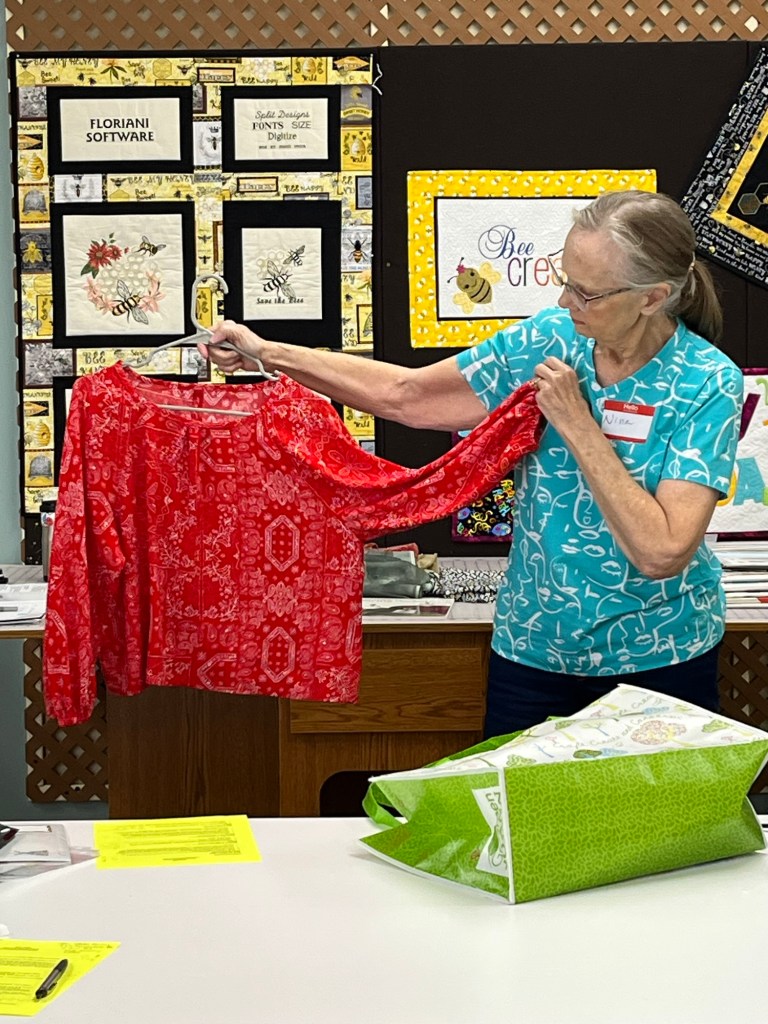
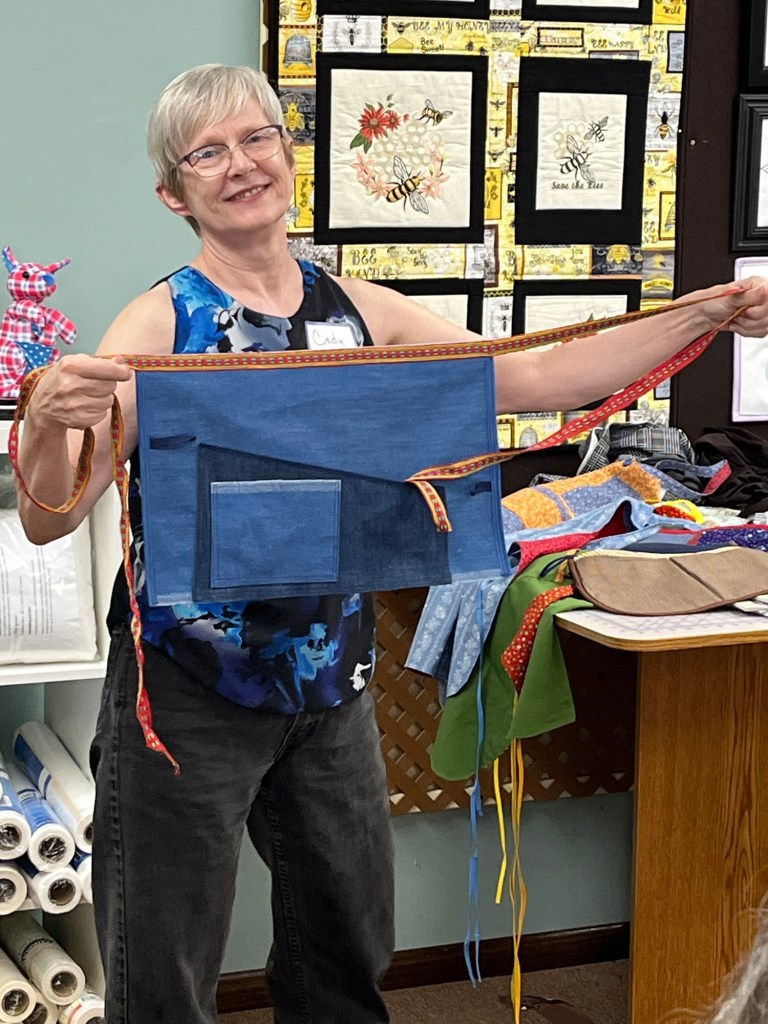
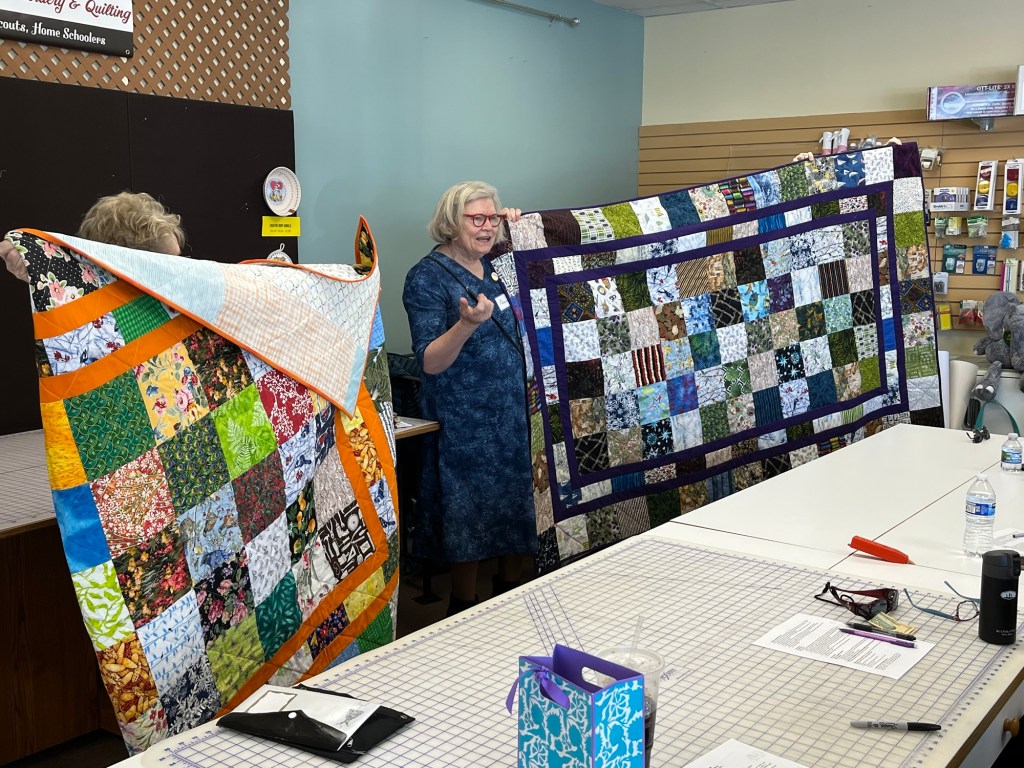
My dad has been gone for a few years now-what to do with his Korean War uniform…No grandchildren wanted it for history reports. The historical society has plenty of them already.So I tried the free Greenstyle Zipper Bag patternFound the perfect thread matchCut out 11 assorted shaped bags and put in zips!!Dad’s March birthday turned in to Easter and summer and finally they were finished at the end of July.Printed on pants pocket liningChest pocket from uniform jacketMade sure every bag had emblems or buttonsThe bag straps were made from the wool uniform tie-all on the bias!The poem I tucked inside each bag-written by my sister
What do you have hiding away that you can bring out in the open?
Next month’s dates and details-switching up our Saturday meeting-
July Garment Sewing Group
Wednesday July, 9, Sewing Inviting, St.Paul
Thursday, July 10, Creative Sewing, Apple Valley
***Saturday, July 12, Meet up at Open Studio Sewing, 4210 Minnetonka Boulevard, St. Louis Park-grand opening!! Wear something you’ve sewn.
For just this meeting, we are going to head to the grand opening of Open Studio Sewing. Debbie and I will bring our garments and pattern review sheets for you to see but no formal meeting. Wear something you’ve made and think about what fabrics/notions you’d like to see at the new store in St. Louis Park! Let us know if you are coming 🙂
Store opens at 11 am-maybe meet for coffee?? More details as date gets closer.
Also, The Stashery has opened at the Textile Center-a year round secondhand textile supplies store.
Fun to see the new options popping up with the closing of Joann!
Debbie’s Garments:
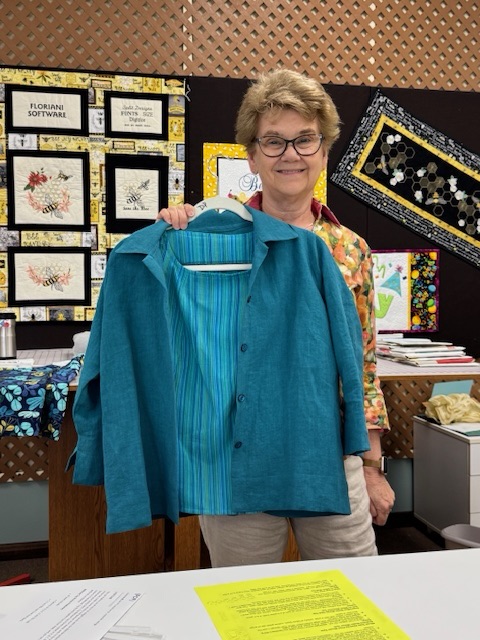
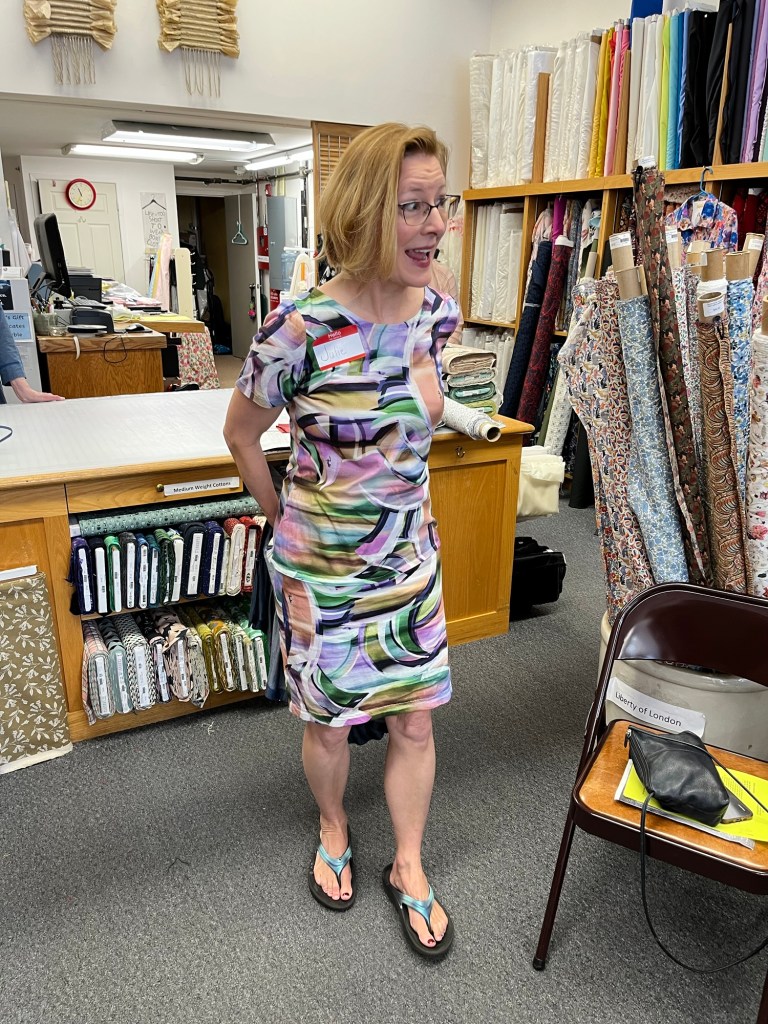
Style Arc Marley Shirt/Jewel Washed Linen
For fit I did my usual petiting as well as narrow shoulder adjustment and shortening body and sleeve length one inch.
Pattern does not call for interfacing the button placket but after testing a piece of scrap fabric I felt the interfacing would be a plus.
I needed to pay attention to the directions carefully since seam allowances go from 3/8” to 1/4”. I did change the order of construction to keep the garment flat as much as possible. I did get myself in trouble though – I did not hem the shirt when pattern directed and made that the last step. It was difficult to maneuver sewing in the round with such a deep hem.
This was a new pattern for me – I especially like the deep, split hem. This pattern is a keeper.
Grainline Studio Willow Tank/Rayon
This is a TNT pattern for me, especially since I have made my necessary fitting adjustments from previous makes. It is a quick and easy make.
I like the neck and armhole bias edge construction rather than facings. I use the serged bias edge method.
This pattern works well with a wide variety of fabric types, makes good use of small amounts of fabric.
Itch To Stitch Santorini Top/Cotton
I made this pattern last summer from a linen as part of a 3 piece outfit. It is a good layering piece, especially under summer toppers.
Even though it is a detailed make I knew it would go together quickly this time since I had made fitting adjustments and also that the pattern directions are excellent.
I put one buttonhole on the side panel and sewed the buttons to the opposing panel without buttonholes. – The tank can be taken on and off easily with just the one button opening.
My first make was a solid linen and the construction details are easily seen. This time with the stripe fabric the princess seams and shaping detail get lost. In retrospect I wish I would have put the stripes horizontal on the front and back side pieces.
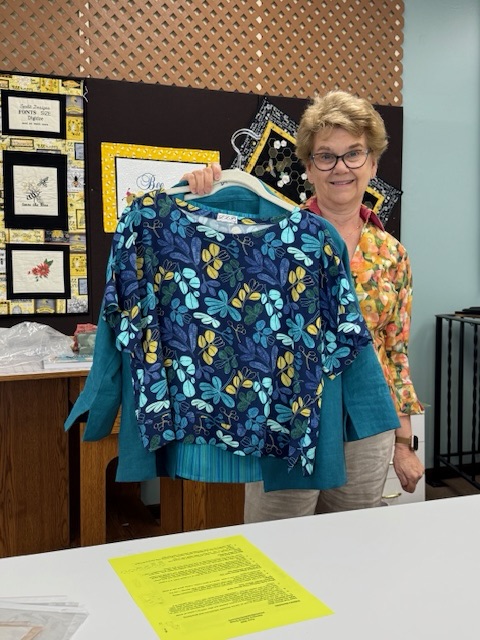
Itch To Stitch Melrose/Rayon
Going through my fabric when picking projects this month this piece caught my eye because it went nicely with my teal makes.
I had a limited amount of yardage so pattern choices were limited. After trying to fit a few other patterns on my fabric the Melrose seemed to work the best.
It is a boxy, cropped top so the only fitting adjustment I needed to make was a narrow neckline.
I changed the order of construction by sewing one shoulder seam and then continue with a serged bias neck edge finish. I also did a split hem.
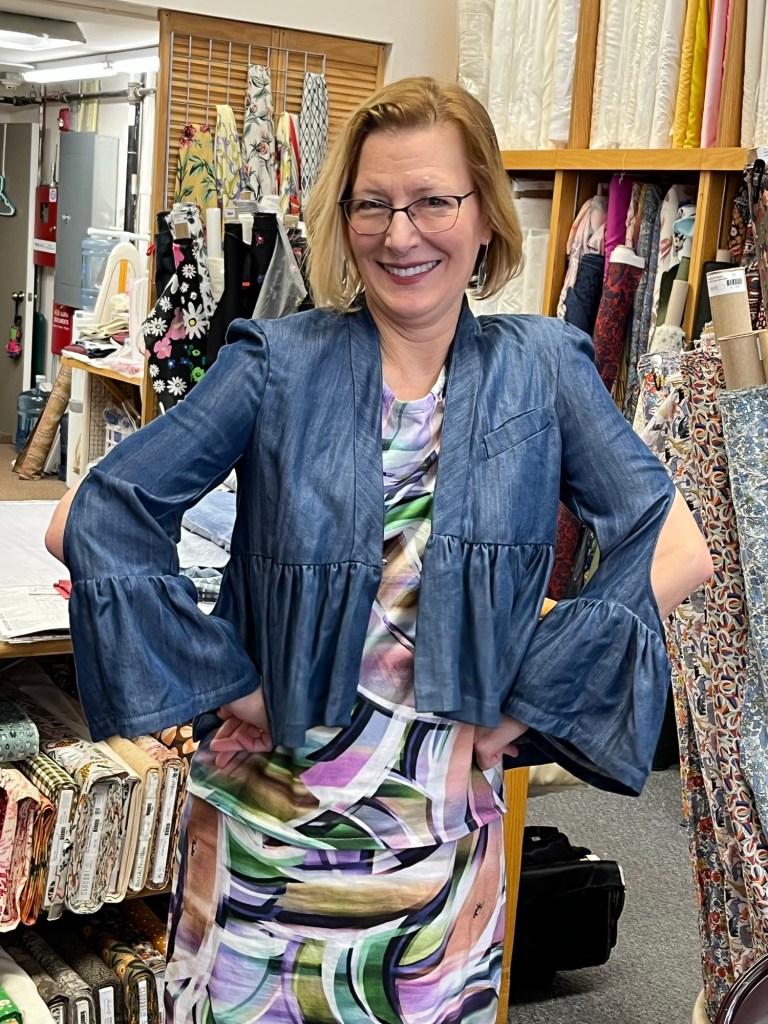
Another quick make but putting a grown on sleeve into a fitted jacket sleeve doesn’t work well. This will not be a layering piece but it does go with my color them.
New Look 6407, View A/Cotton
I made this pattern many years ago and it is a favorite. I do like the fitted style.
Due to my petite adjustments the neckline isn’t too low which is fine in warmer weather but not a style I like to wear in colder weather.
The print main fabric is a bit busy so to break it up I added a contrast fabric to collar, neck band and cuffs. It’s a little bright but I think it works.
The split cuffs are fun and a nice change from classic shirt cuffs.
Kristin’s Garments
Anything But Ordinary/Cutting Line Designs/Cotton woven
In preparation for my quilted jacket (hopefully next month) this pattern seemed a possibility and the fabric was perfect!
Made a size small to pattern but added topstitching and a bias band at the neck. I like the back vent.
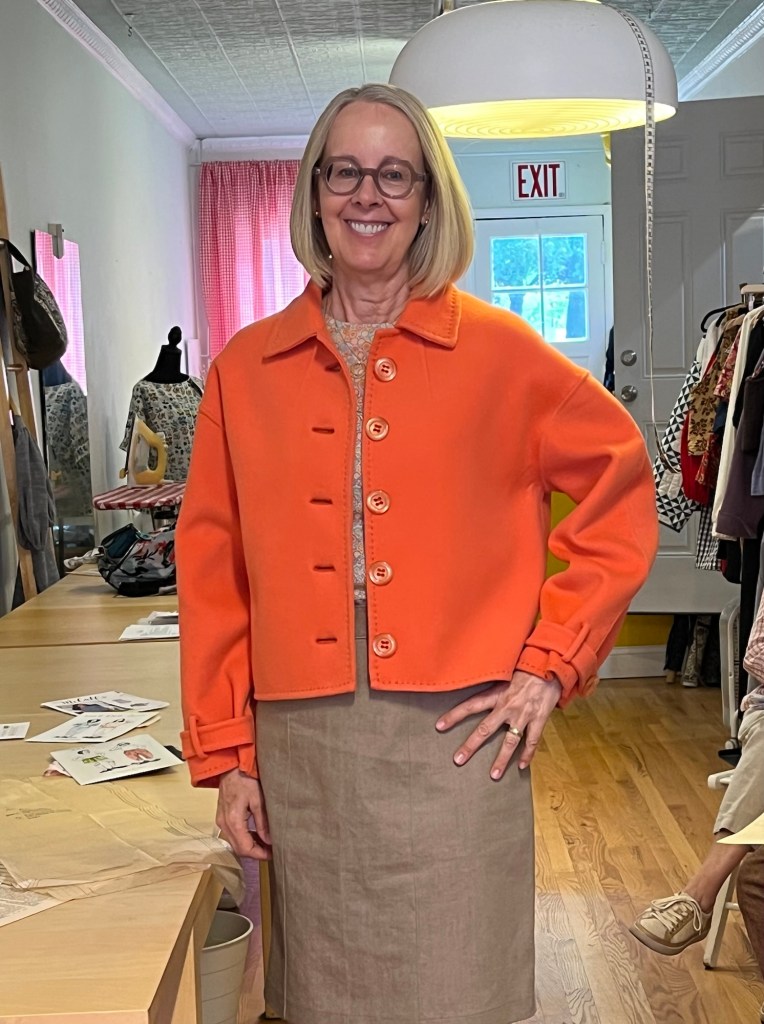
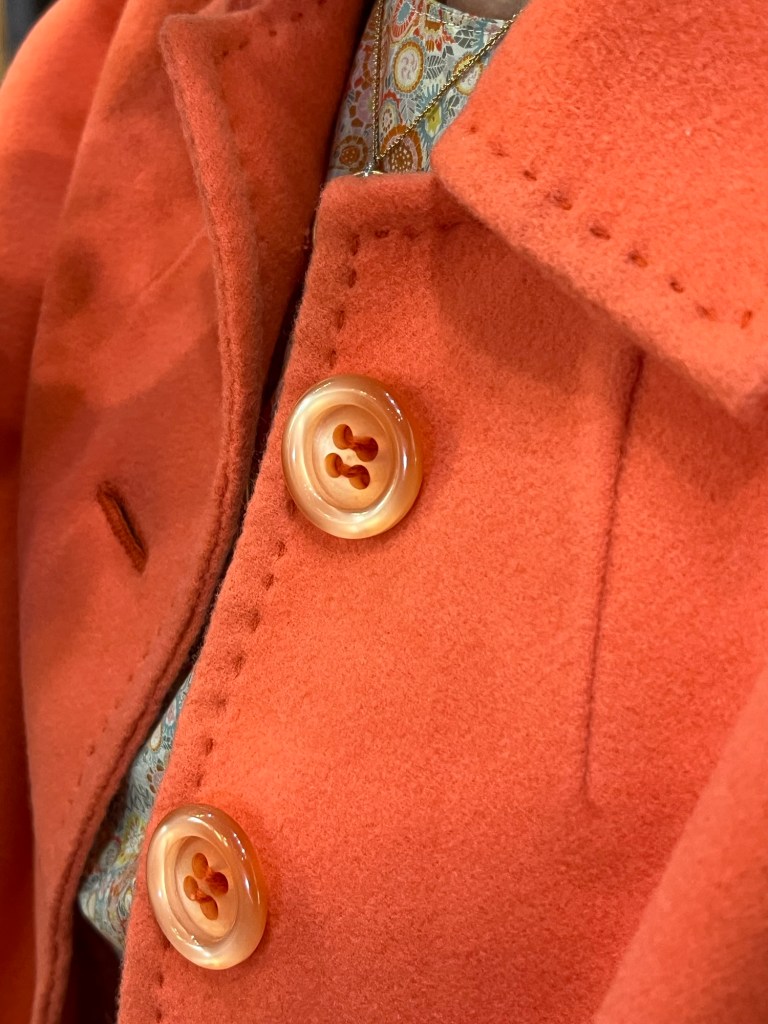
Custom Pants Retreat (see orange shorts in two photos above)
Vogue 7881/Robert Kaufman linen/cotton blend
Lots to learn at the couture class. Vogue pattern was very similar to the Rika/Closet Core pattern of a few months ago. Attempted shorts for my first post muslin trial.
Omitted zip front and added casing. Couture techniques most likely won’t show up in future sewing projects but it was fun to learn how.
Burda 6990, View A/Poly knit(notice the yogi print :))
Tried and true pattern. Used the crew neck version and realized you get at least two entire shirt patterns in a package. Unfortunately the yoga retreat happened before the outfit got done!
Roxanne Cargo Sweatpants/Cotton French terry
Went down two sizes in all seams except waist to give me a bit deeper crotch level. Made shorts as a muslin-added 3” to leg length!!
Used Tinley pocket pattern to get slant pockets. Great pattern!
Great group of people at Sewing Lounge on Saturday! Thanks to all who attended!!
Great print for a teeCool shoes kept showing up! Wearing Sewing Workshop Riviera TopSew House Seven Revel TopAnother finished pair of Happy Feet!With cool labelsTerrazzo Dress from Closet Core CrewCutting Line Designs Light and ShadowAssembly Line Pleat Front Shirt and Syd Graham Saundra SkirtEvery state park in this little one’s future-Lucky baby!!
Great makes at Ginny’s and Creative. Duck in out of the rain with us at Sewing Lounge on Saturday, 6/14, 10:30 am!!
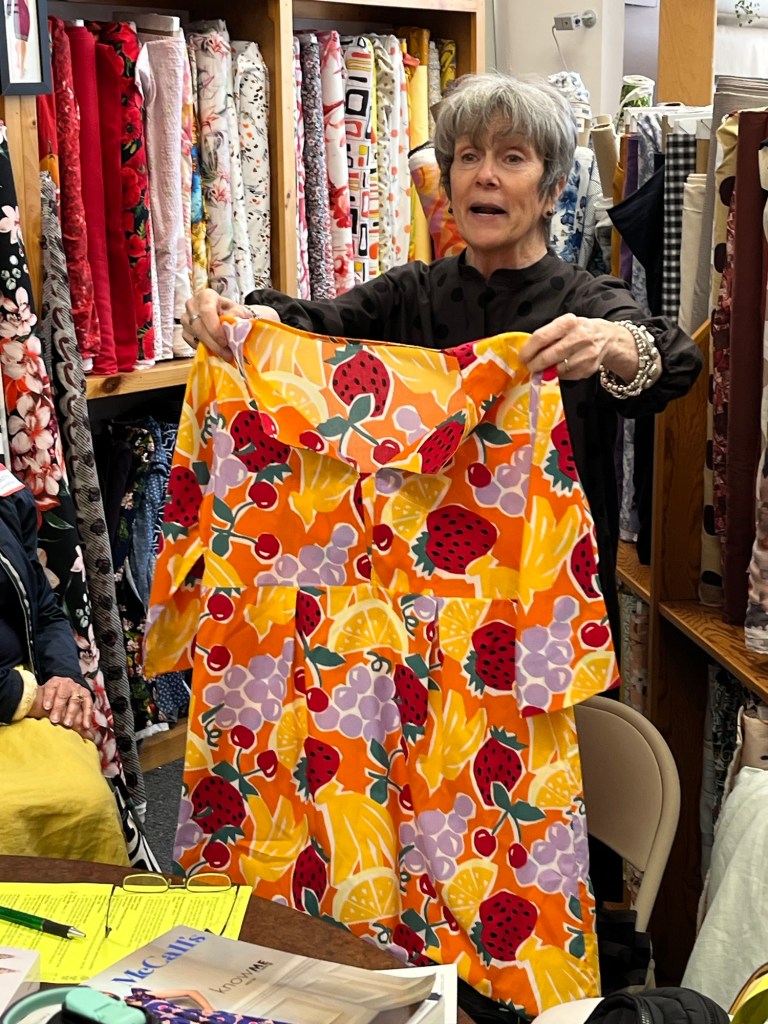
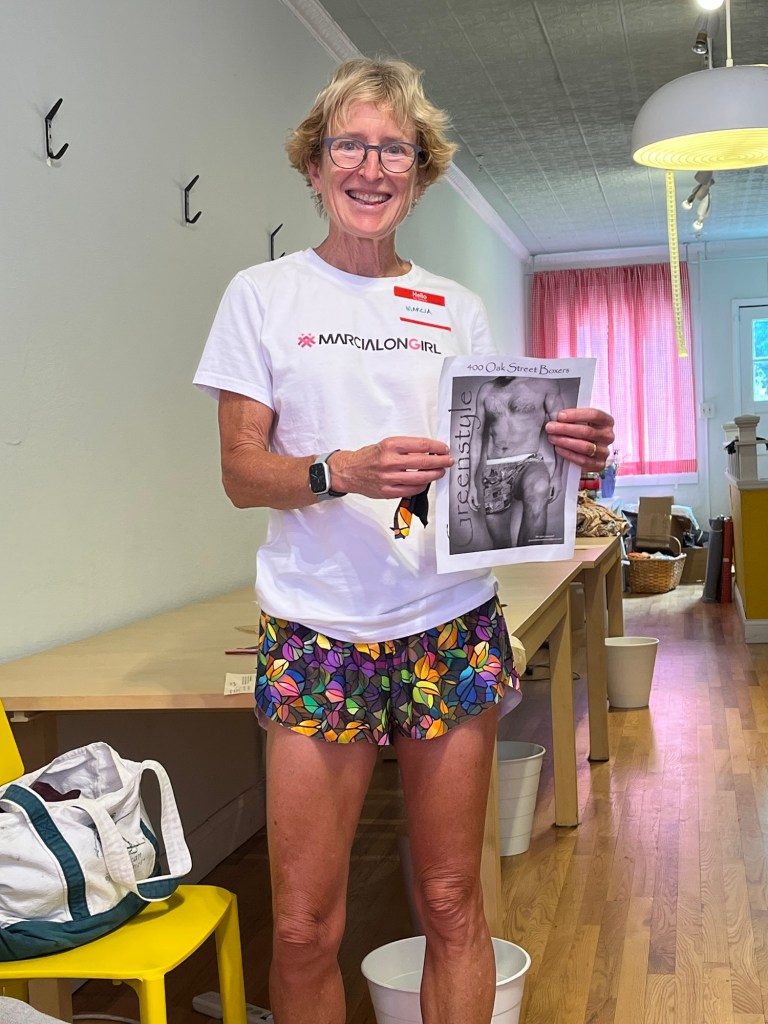
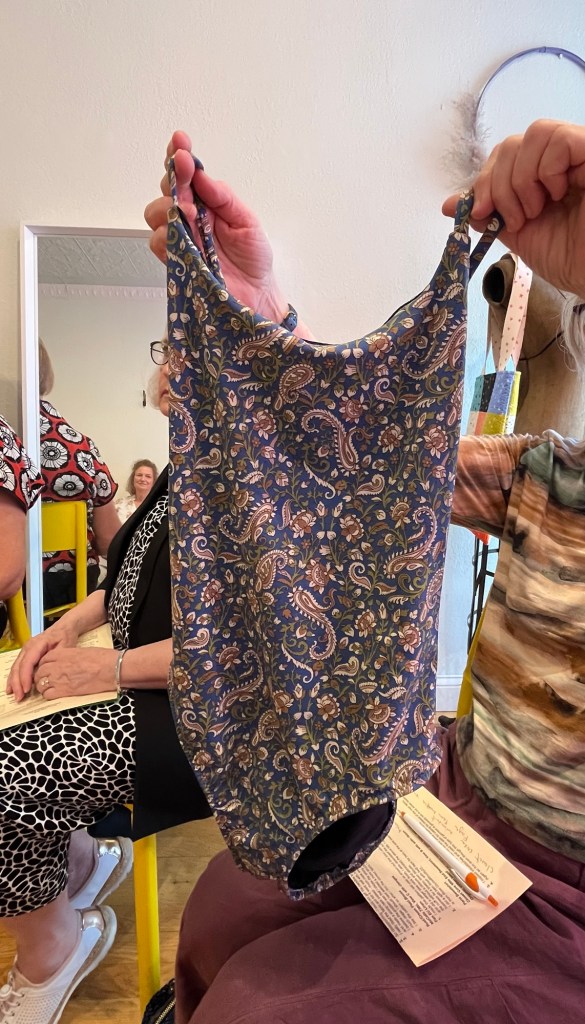
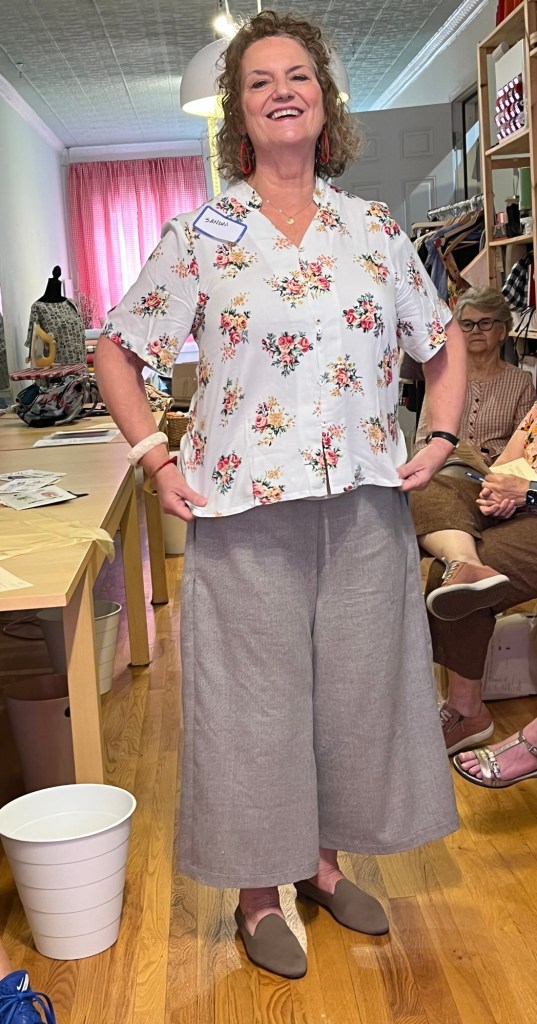
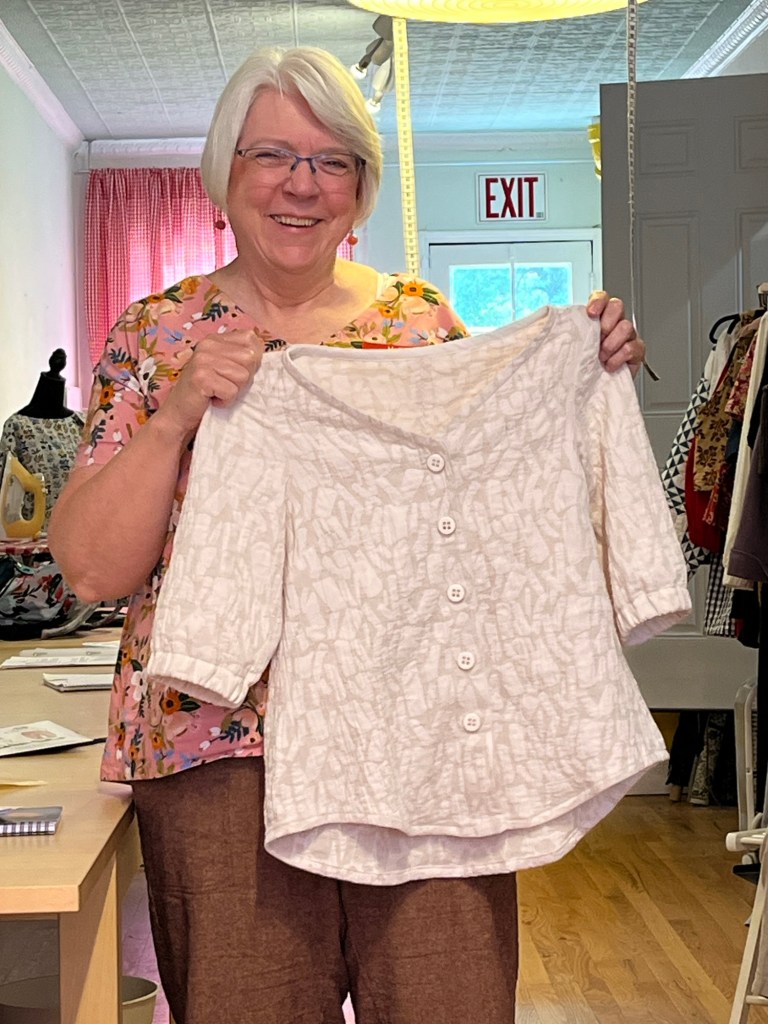
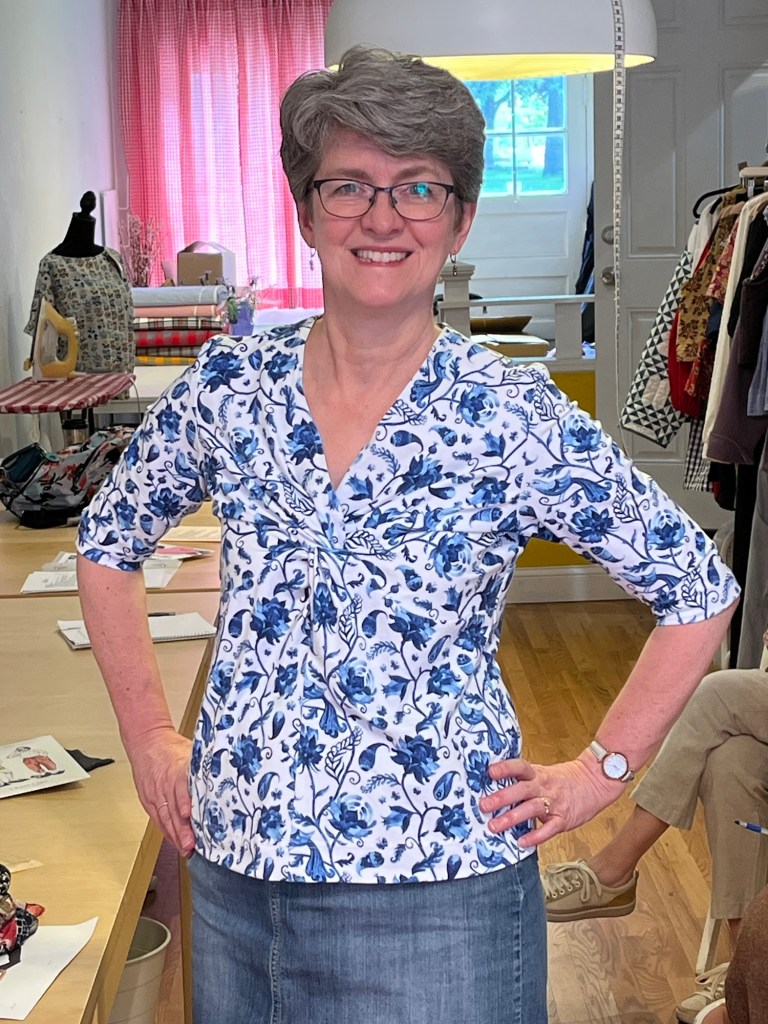
First up, our U of M Fashion Design student (one more year!) in Burda 6146End of year project-a swim suit-she highly recommends making your own-A big month for blouses! New Look 6407 (Debbie also made it this month)Wren Blouse from Chalk and NotchAlso Wren/Chalk and NotchPuff and Pencil Wrap BlouseSimplicity 8983Polka dot remnants on a tankFashion trend: Fruit!!! In Schoolhouse Tunic/Sew Liberated“Just” a tee shirt dress (OK, tee and skirt/McCalls 6886) in PUCCI knit!!“Just” a denim jacket-Vogue 1710With HOLES at the elbows!!!“Walking the moors” in her Jalie Genevieve skirtAnother great summer blouse-Matchy Matchy Collage TopClown costume for the grandkidsSewn Upline Jacket hacked into a summer sweatshirtStylearc Verona on hanger/wearing Jalie Women’s T-ShirtJalie Eleonore as nicely topstitched jeans (no, she didn’t make her sneakers-but she could have!!! 🙂One more Happy Foot! And the beginnings of second pair!
It’s fun to edit the photos and relive the garments we saw and fun we had! And since sunshine is lacking today-here are a few warm weather makes for starters-
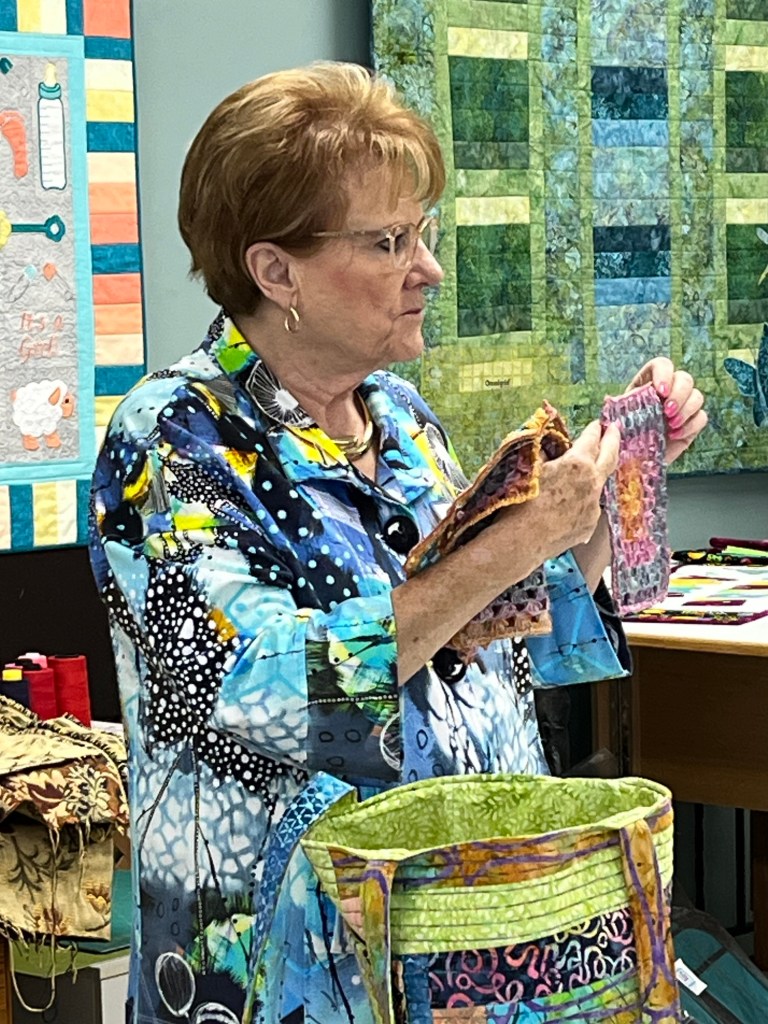
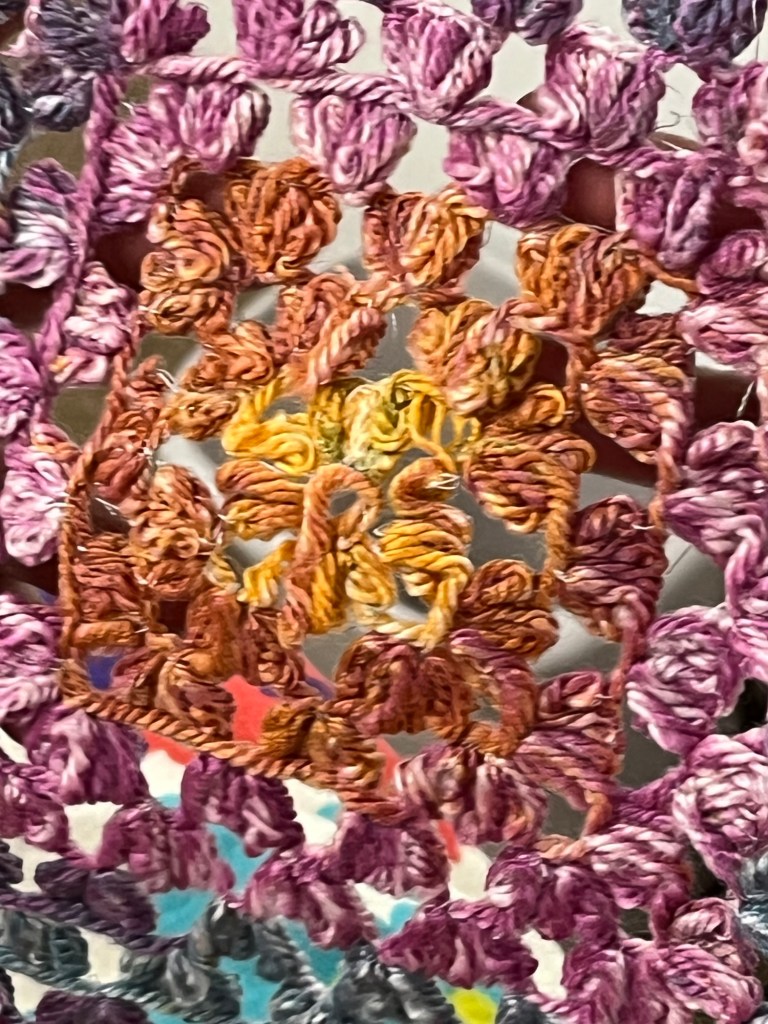
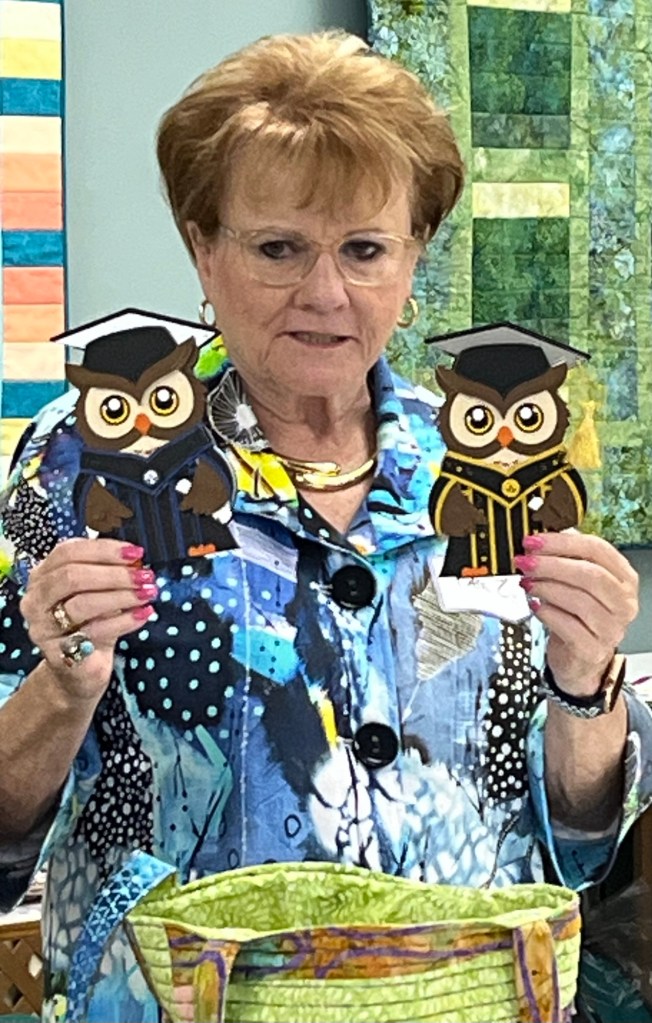
Greenstyle 3R Shorts in Caress Athletic fabric from Discovery FabricsHighly recommended Faye Swimsuit from Closet Core PatternsCashmerette Calder PantVogue 1868 and Free Range Pant/Sew House SevenSewing with next generation hacked pattern 🙂Vogue 1477 Sandra BetzinaNew Look 6150Bella Loves Patterns Kaia Coat with great instructions and video for making from double clothClose up detail of handworkNew Look 6582Remy Raglan with sleeve extension/Sew House Seven, StyleArc Twig PantVerdin Woven Tee Liesl & CoSinclair Delia Top and Jalie Eleonore PantVogue 9347 Blouse and Sew House Seven Free Range PantCashmerette Haskell ShirtAprons and Bags Galore!Granny Squares with her embroidery machine!!!Amazing!!Graduation Season!
Bringing a little sewing sunshine into your rainy day!
Debbie’s Garments:
Vogue 1644, View A, cotton main fabric, Bemberg rayon sleeve liningAnd, as usual, the inside does not disappoint 🙂
I have made this jacket before so my petite adjustments were already made along with narrow shoulder adjustment and slimming sleeve width at hem.
The darts are so small in this pattern that I eliminated them and eased in the bust fullness in the princess seam without any problem.
The fabric for the jacket raveled easily so I did partial Hong Kong finishes and serged all other seams.
The two piece sleeve and faced hem are a plus for this pattern.
I am a fan of lightweight jackets in the warm seasons du to air conditioning and this jacket will help ward off too much chill. It was a quick and easy make.
NOT The Assembly Line Puff Sleeve Shirt, Rayon challis
I made my standard petite adjustments on the pattern, pin basted, made more adjustments – narrow shoulder adjustment and put “darts” in neckline of paper pattern and finally cut out the pattern from my lovely fabric and did lots of basting. The neckline was too big so I made more adjustments and sewed away.
So disappointing – I could not get the neckline to fit properly.
I really liked the fabric and felt it went well with my jacket so – I cut off the original neckline and made a scoop neck instead – much more wearable for me.
I believe the problem was that I chose the wrong fabric for the pattern. My rayon has too much drape. I should have selected a more structured fabric.
I like the pattern so when I find the correct fabric I will try the pattern again.
McCalls 7360, View C with changes, Flax EU linen
I made this pattern last year as shown but this time I eliminated the collar/neckband and did a serger bias neck finish. I also downsized the cuff, gathered the sleeve into the cuff without a closure and eliminated the sleeve tab. I didn’t want all that fussiness for a breezy linen blouse.
I did a split hem finish with twill tape for hem at the side seams. The method I used is from Rose Glyde@thudiy22.
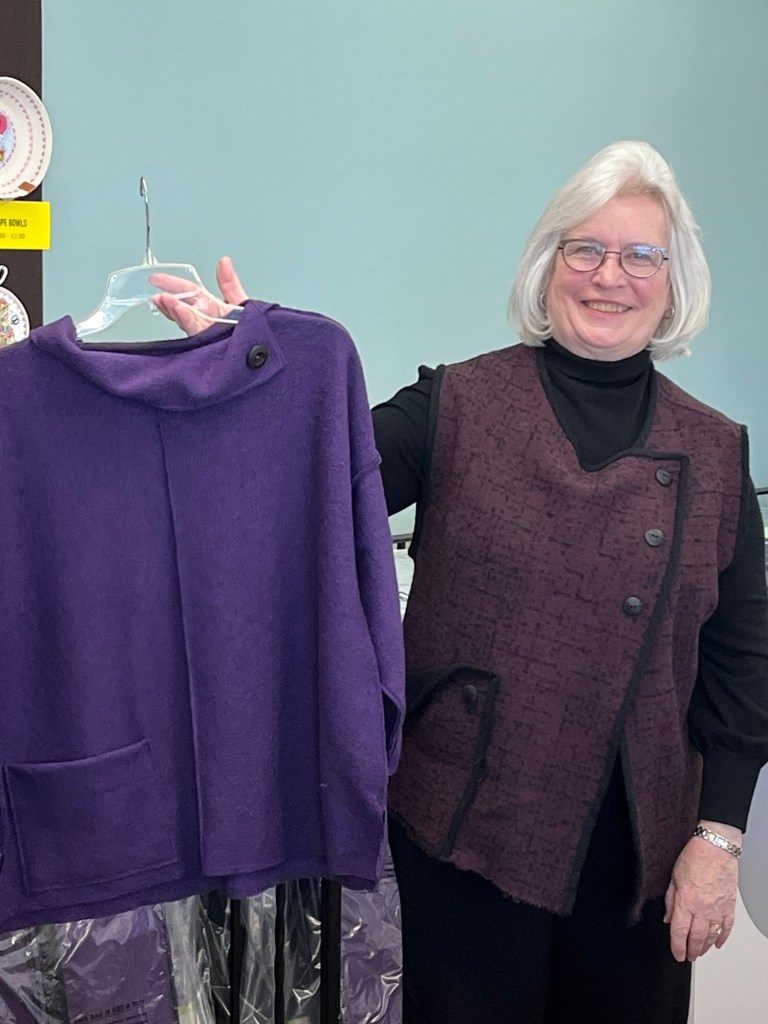
Closet Core Mile End Sweatshirt, View B with satin ribbon, organic cotton
This was so fun for so many reasons: great fabric, easy and attractive details like the darts on the sleeve, back seams coming over to side front, oversized but not too much and quick and easy to make.
It is a cropped top so I did not do any petite adjustments.
I copied Intostitches and used the satin for casing tie instead of the main fabric.
Again so fun even though this type of garment is generally not in my wheel house!
Kristin’s Garments:
Simplicity 9705/Cotton
This pattern has been calling to me from my stash so gave it a try in cotton. Very well drafted, all went together well. Lots of pleats and darts but really only two pattern pieces and a facing.
Zip was needed as neck is close fitting. I would like the sweetheart neckline to be a bit bigger all around but it fits well. Sleeve pleats make wearing easy when on but a little weird getting off and on.
Fit changes-raised the waistline so it was 1” shorter overall, minimized vertical darts.
I think I’ll keep the pattern for future as it has some good features and fit well but it won’t be a go-to pattern.
Sepia Pants/Closet Core/Lightweight linen
More darts, please!! Three darts per leg and the knee dart is on inside leg but after the blouse, not a problem-if only I felt as good about my zippers!
Swapped out the outside pocket for an inside pocket (pattern calls for a stacked pocket!! Cool feature if you are into it. Curious to see how a curved pocket hangs as my last few pants have had a straight diagonal line for pocket opening.
Pattern has pocket facings (and hem facings) so I used them to get a nice finish and be able to have my fancy fabric right side out on my pocket so I see it. But then I held up the pants and realized I can “see” the fancy side through the pants!!! Hopefully I will not stand still and no one will notice 🙂
Waistband is almost 3” deep so I cut that down to a 1” casing. I like the pants-slimmer fit than others and fun to put together.
Burda 6451/Textured weave rayonA little more detail-
Pattern has been in stash and catalog pic compelled me to give it a try. Collar didn’t call for interfacing but after trying without (too flimsy) I interfaced. Top went together well.
Skirt has a lining so sewed that up first and-too tight! Called Sarah’s Fabrics in Lawrence, Kansas and got 3 more yards as there wasn’t enough to cut a second skirt.
Was very curious how the tulip shaped front skirt would hang with straight back skirt-added about 3” to back skirt. Pleated the difference in back skirt to back bodice to match the front pleats. Very happy with the skirt! Didn’t use the lining as it restricted movement and didn’t want more weight pulling bodice down. Pleasantly surprised at how it hangs on body.
Again, not a go-to pattern but the drafting was fun to work with and I love the fabric!
Workshops at Ginny’s/Rochester-3 Day Pants Fitting, June 3-5, 3 Day Hand Tailoring, June 6-8, 3 Day Couture Dressmaking, June 9-11. More info www.LoveCoutureSewing.com
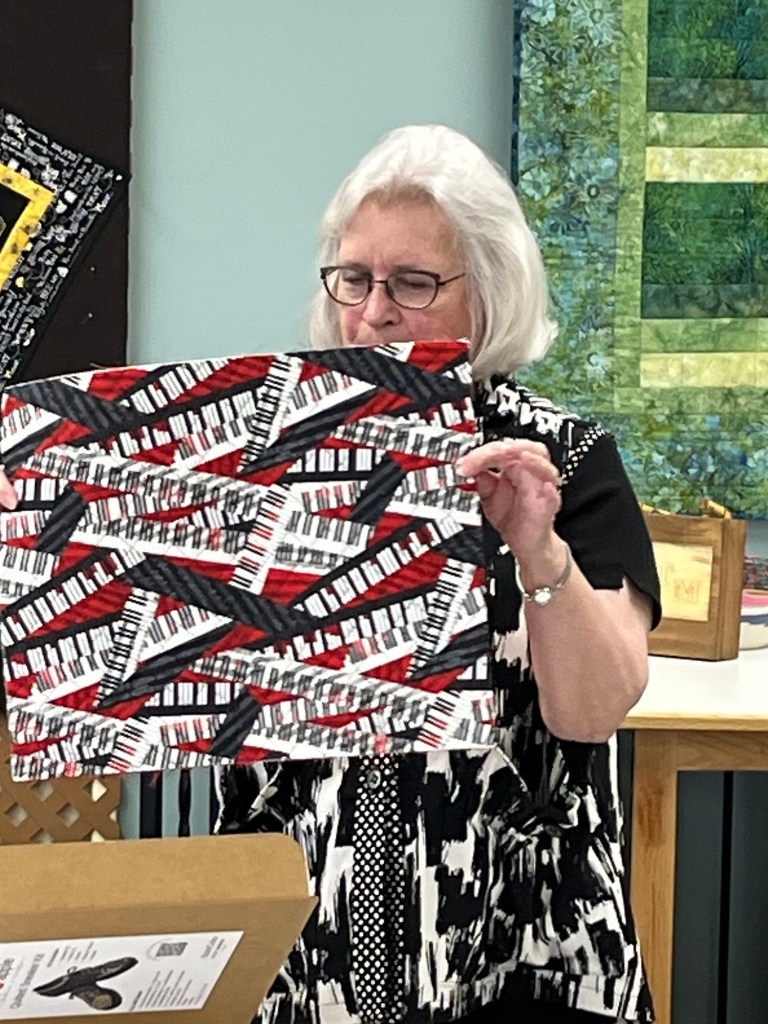
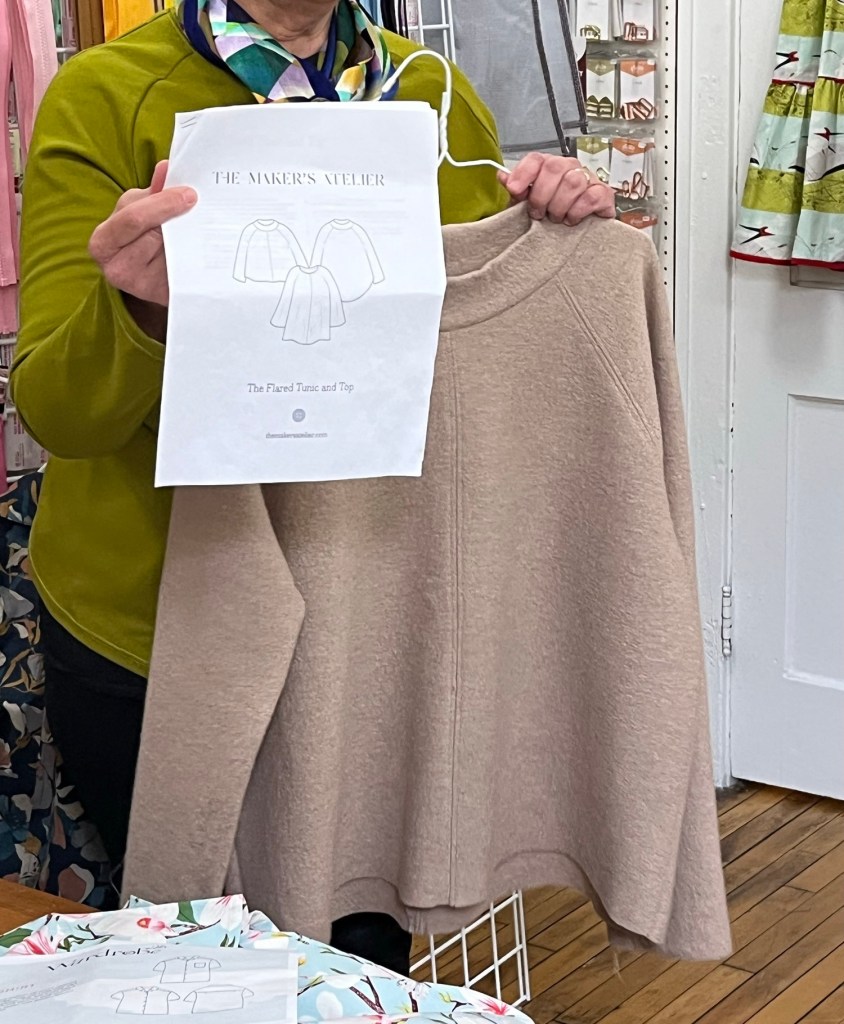
Butterick 6142SpaghettiWestern Company Rue Quilt CoatCutting Line Designs A New DimensionWork in progress-Chanel jacketLove Notions Chorus TopHelen’s Closet Arbutus RobeThe Assembly Line Tulip DressFriday Pattern Company Patina BlouseSee pattern below-So many pattern companies out there!!McCalls 8468 in fleeceSewing Workshop jacket from kantha clothPuff and Pencil The Waist BlouseGrainline Studio Lark Tee Wardrobe by Me Tropical Shirt and New Look 6763Pattern Emporium Downtown Jacketand Love Notions Aria ShirtButterick 6600Christine Jonson Travel Trio 2 Funnel NeckPaper Theory Olya Shirt in Liberty of London, Jalie Sweatshirt, Jalie Roxanne PantStylearc ArchieCloset Core Sienna JacketButterick 6906Vogue 9276Staying warm Sew Liberated Studio TunicNew Look 6145Sew House 7 Moon Booties modified for biking boot coversThread Theory Men’s Eastwood Pajamas Maker’s Atelier Flared Tunic and TopSuzanne Mock Neck by Fraya Etsy pattern from Magical WeaveVogue 1635 (see shoulder/sleeve zip detail)Ready to wear copyBeautiful quilt!!
Can’t wait to see people tomorrow at Sewing Lounge, Thursday at Creative (and Fabric Swap) and then Saturday at Lakes Makerie (fingers crossed-the snow curse is over!)
A great turnout after a snowy week! Great variety!
Sew Over It Coco Jacket/Jacquard Bonnie Top Stylearc/New Look 6055 shorts Itch to Stitch Zakopane TopStylearc Teddy TopButterick 6422 coat/Cutting Line Light and Shadow VestSimplicity 1197Must have inside pocket 🙂
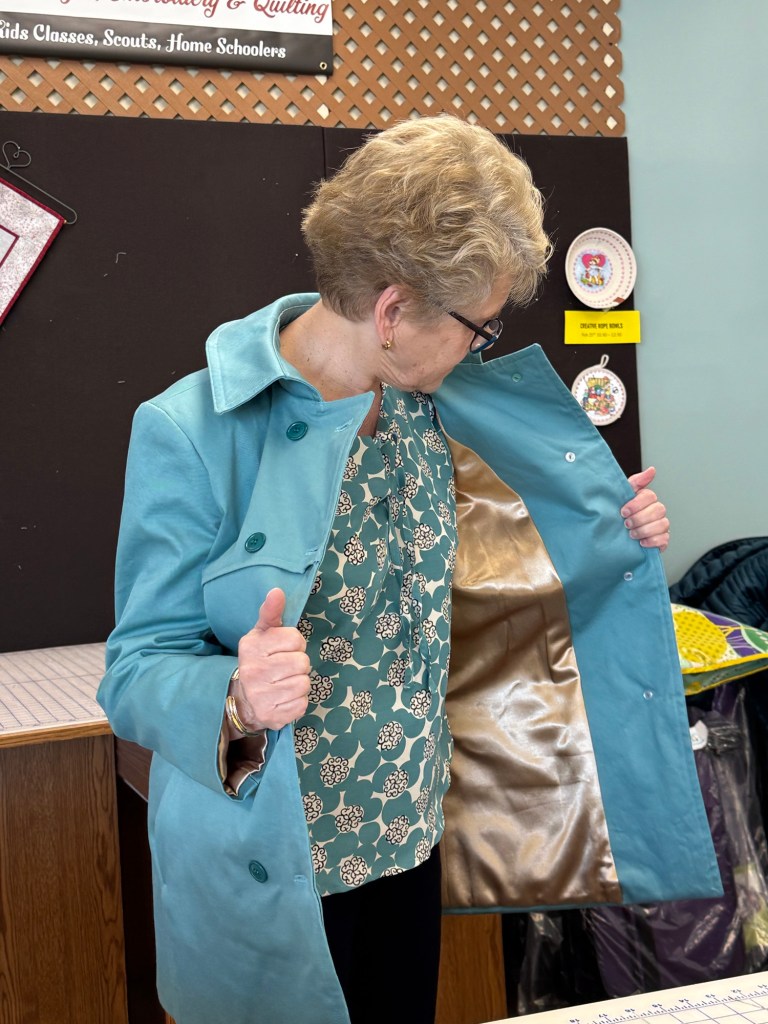
Vogue 8884, View B/Denim with flannel backed satin liningWarming it up a bit for MN spring 🙂
1. Fit adjustments include petiting between shoulder and bust, narrow shoulder adjustment and shortening the sleeves 2 inches.
2. The pattern includes lining pieces and recommends interfacing the entire front which I did as well as adding interfacing to sleeve cap and all hems. The weft interfacing I used is heavy. I think a lighter weight interfacing would have been a better choice. The pattern calls for shoulder pads. I added sleeve heads.
3. I squared off the collar and lapel edges. I also lost the pattern piece for the collar stand and needed to make my own pattern – more difficult than I thought.
4. When constructing the jacket I sometimes felt like I was wrestling with an alligator. The lining was slippery and the interfaced denim was stiff.
5. Buttonholes were not fun-I eliminated a second set on the inside of the jacket.
6. Even though constructing the coat was a challenge I do enjoy coat making!
New Look 6582, View A/Silk
1. Fit adjustments include petiting between shoulder and bust, shortening the sleeves 2 inches and shortening the length 2 inches between hip and hem.
2. Design changes I made were shortening the front slit and softening the curved hem.
3. The blouse is an easy and quick make. The most difficult construction step is getting the sleeve elastic to cooperate in the very full sleeve casing.
Teal/Cream Geo Print Boatneck Tee
Butterick 6966, View B/cotton jersey
1. This new to me Palmer/Pletsch Tee shirt pattern caught my eye. I make and wear a lot of tees and am always on the lookout for something different.
2. Palmer/Pletsch patterns are filled with directions for basic fit adjustments. The back neckline on this tee was 1 and 1/2 inches below neck so I decided to do a rounded back adjustment. I think I could have done better by just raising the back neck. Besides my standard petite adjustments I did decrease neck opening from 1/4 inch at top of sleeve to “nothing” at neck opening.
3. There is a lot of length in this pattern. I shortened the sleeve length by one inch and body length by 2 inches.
4. This pattern also caught my eye due to the bust dart which I appreciate. I pressed the dart up “for a more youthful look” as quoted in the directions!
Kristin’s Garments:
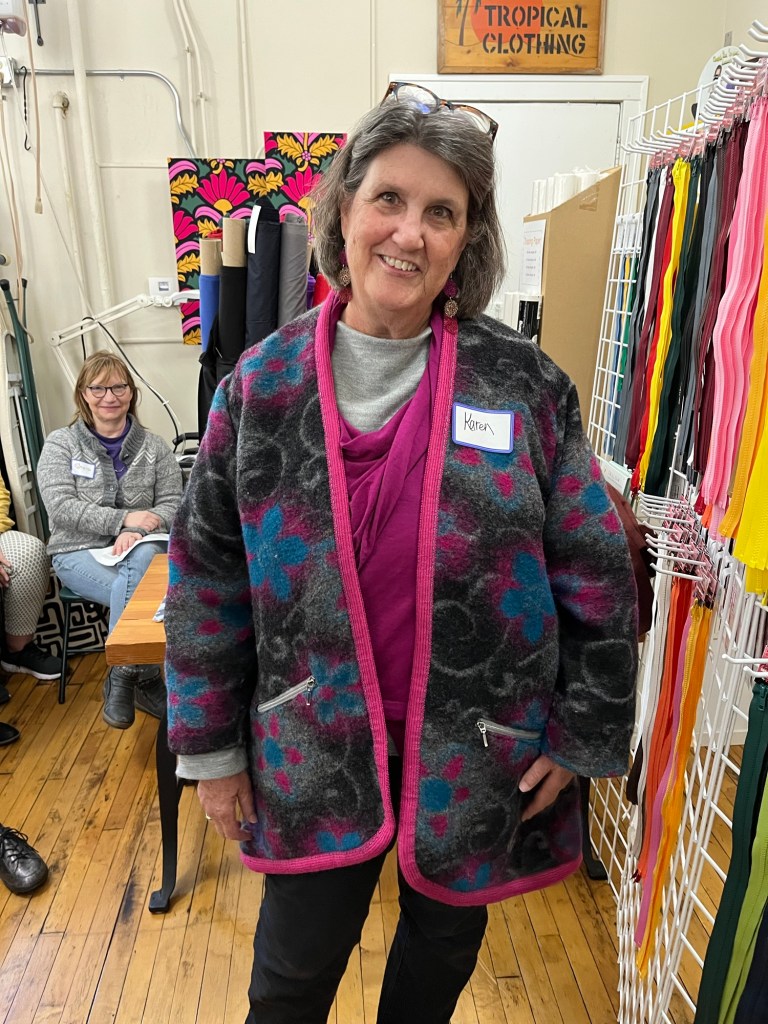
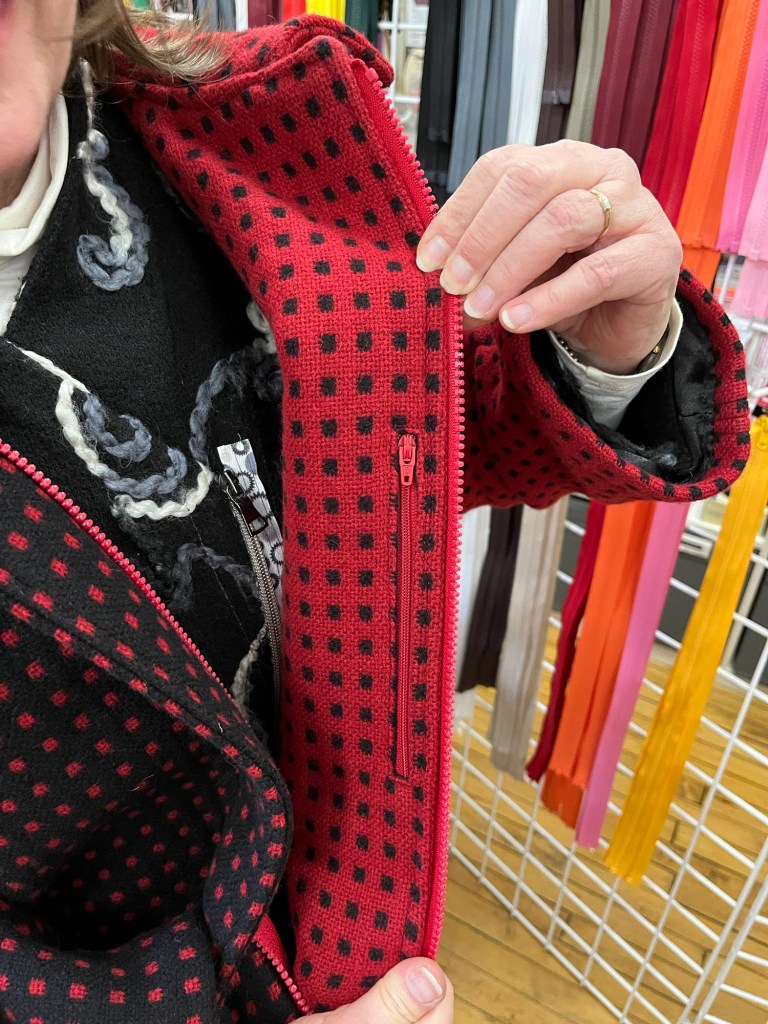
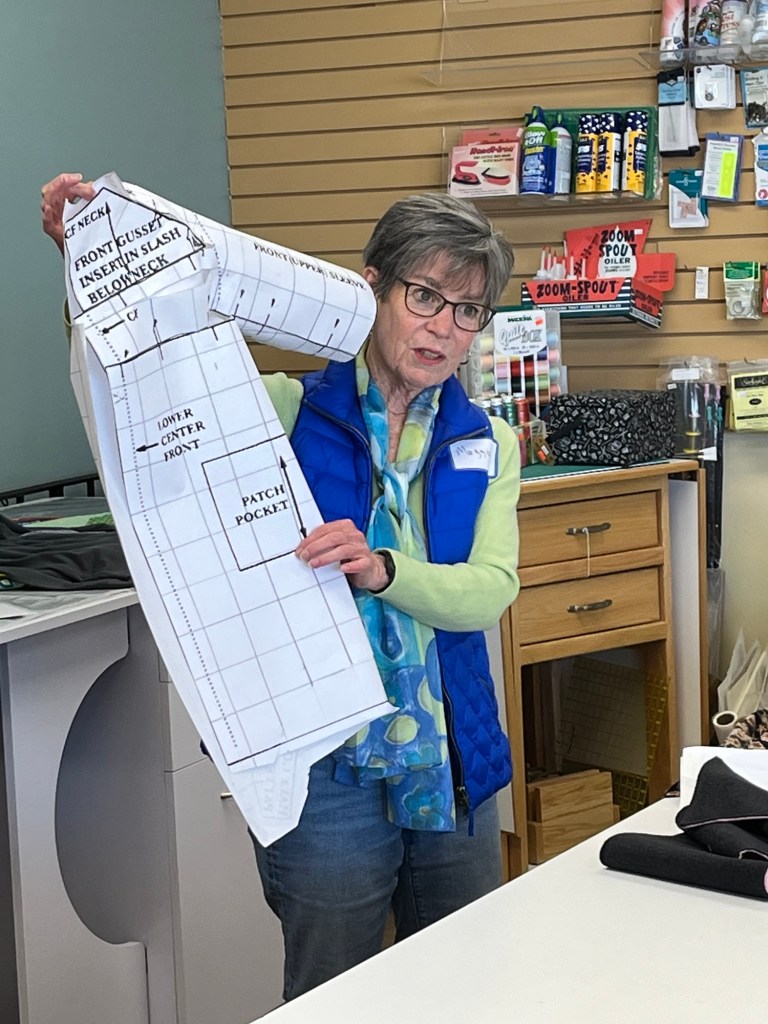
Burda 5870/Melton woolSilk lining
1. I had to sew up this wool that I bought at Sewing Workshop in Kansas last fall. Not sure that the color is what I should wear but I will pair it with other colors to bring out my colors.
2. The deep cuffs, lack of collar, and stitching lines are what drew me to the pattern. I didn’t want a bulky jacket to wear under winter jackets.
3. I made a size 16 and went to 18 at hips-length is to pattern. Shortened sleeves 1 1/4” below the elbow pleat.
4. The pattern has buttons so I cut off facing and CF to make it compatible with zipper.
5. The fit is close so I’m glad it has a lining. Lining front was in one piece with a dart-clever, Burda! I did more bagging of the lining than directions gave.
6. Rivets were added to amp up the look-I think it’s a very versatile jacket depending on fabric and notion choices.
Burda 6146/Wool crepe
1. I’ve made this blouse before in rayon and like the front slit (the depth of the slit is “to pattern” and perfect for me). The wool crepe is puffy so I didn’t want to do all the gathering of the neck “frill”. Instead I used a collar neck stand piece from another pattern to give me something that would look good under the above jacket.
2. This fabric was also from Sewing Workshop. The ties are made from the silk that I used to line the jacket and was purchased at Sew Inviting. I love them together! My previous blouse had a hook and eye at the neck and always comes undone so the tie was the obvious answer and part of the pattern. Ties for women also seem to be catching my eye (we see what we look for, right?)
3. The sleeves were altered to come in at the wrist and be less full. The fullness left over was pleated into a 1” band.
4. I also learned my lesson and interfaced neckband and facings 🙂
True Bias Hudson Jogger/Knit corduroy
1. Another fabric find from Sewing Workshop. Figured the stretch fabric would work great in the Hudson-wrong!! When are you going to learn to check out the stretch of a novelty-strike that-any knit before cutting??
2. Fortunately I added an inch to the rise.
Tanks (Evie Tank/StyleArc) and Turtles (Burda 6990/raglan) and McCalls 6796 (sorry, no pics)
1. My go-to patterns in warm, thin wool for under layers.
Wanna go? Take a train? (Train tickets appr. $100 leaving from MSP or Red Wing:)
Haute Couture Club of Chicago Fashion Show
When:
Sunday, May 4th 2024, 11:45am-3:00pm CST
Where:
Chicago Yacht Club,Chicago, IL 60601
Cost: $65 per person
April 5th is deadline for receiving garment entries.
April 2025 Garment Sewing Group
Wednesday, April 9, 10:30, at The Sewing Lounge, St. Paul
Thursday, April 10, 10:30, at Creative Sewing, Apple Valley
Saturday, April 12, 10:30, at Lakes Makerie, Minneapolis
Wow, driving up to Apple Valley was an eye opener! Lots of snow piled up everywhere. But the roads were good and we were all glad to see our sewing people and amazing sewing projects.
More to come on Saturday (tomorrow) at The Sewing Lounge!!
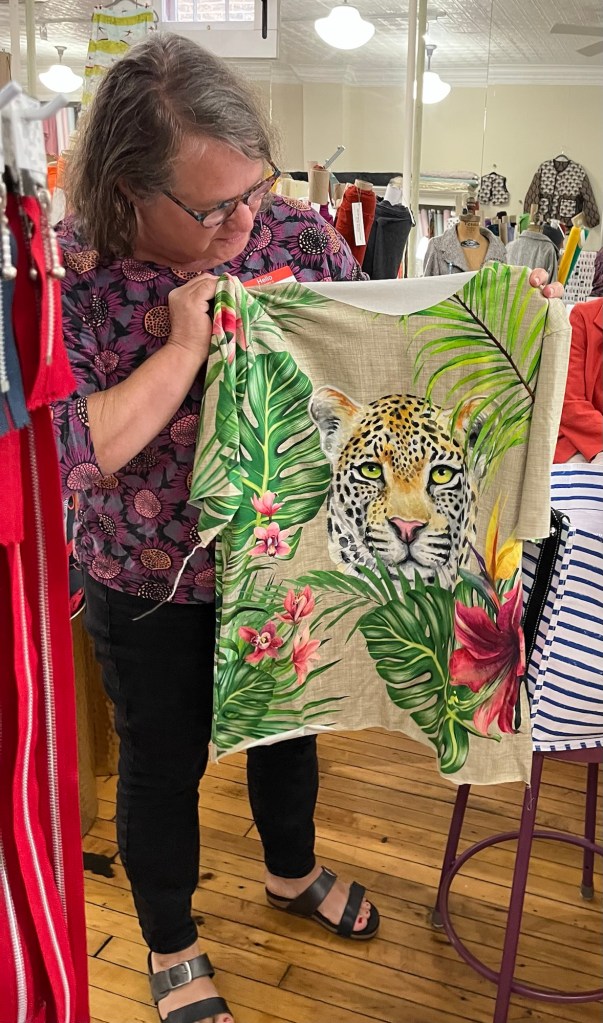
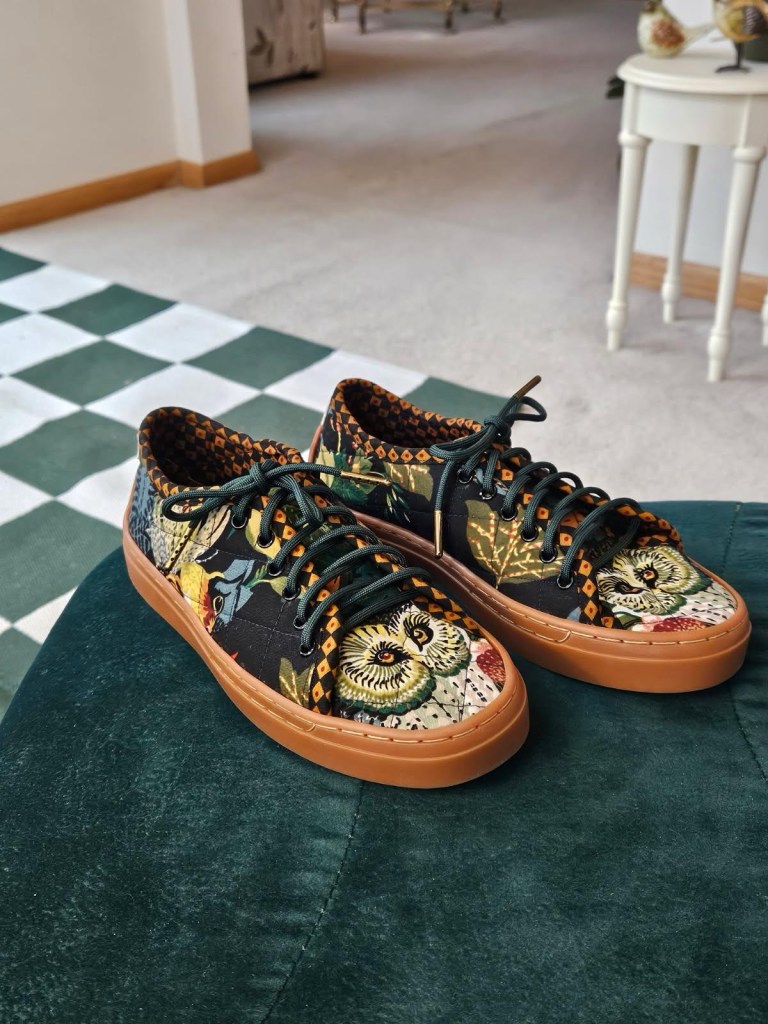
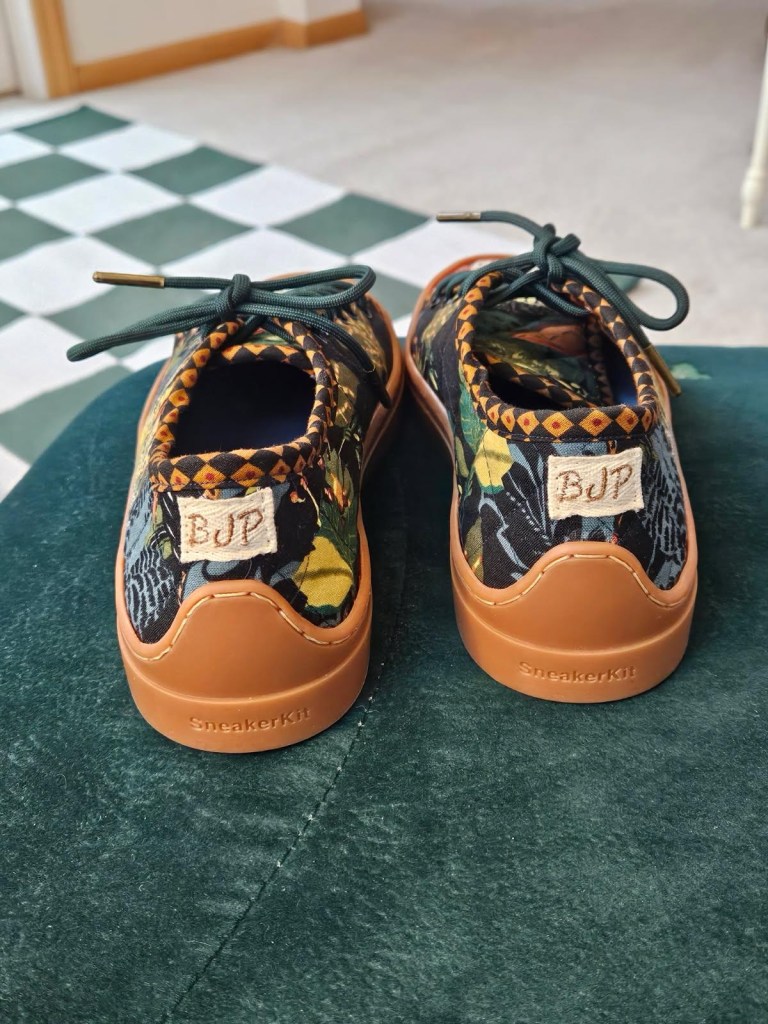
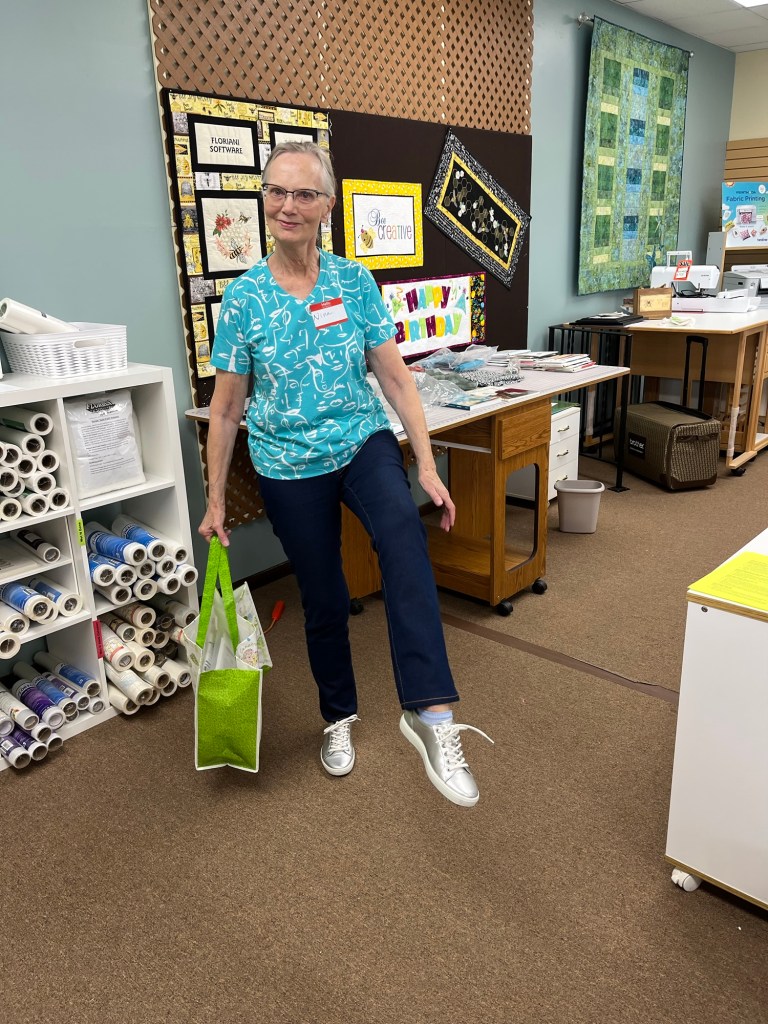
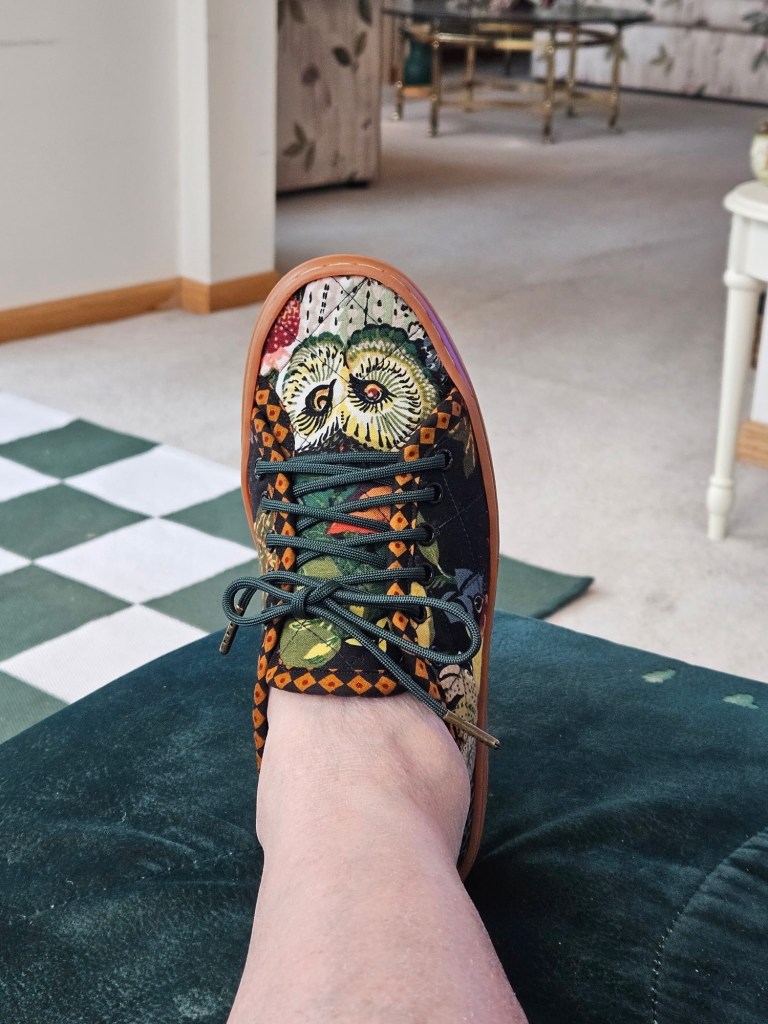
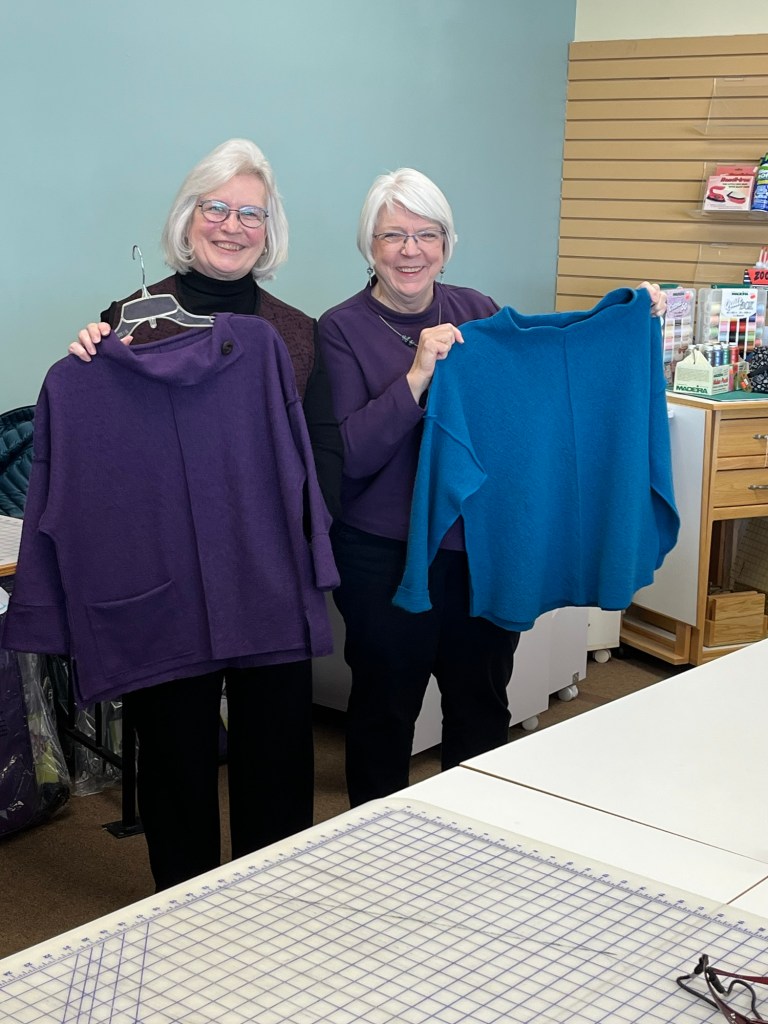
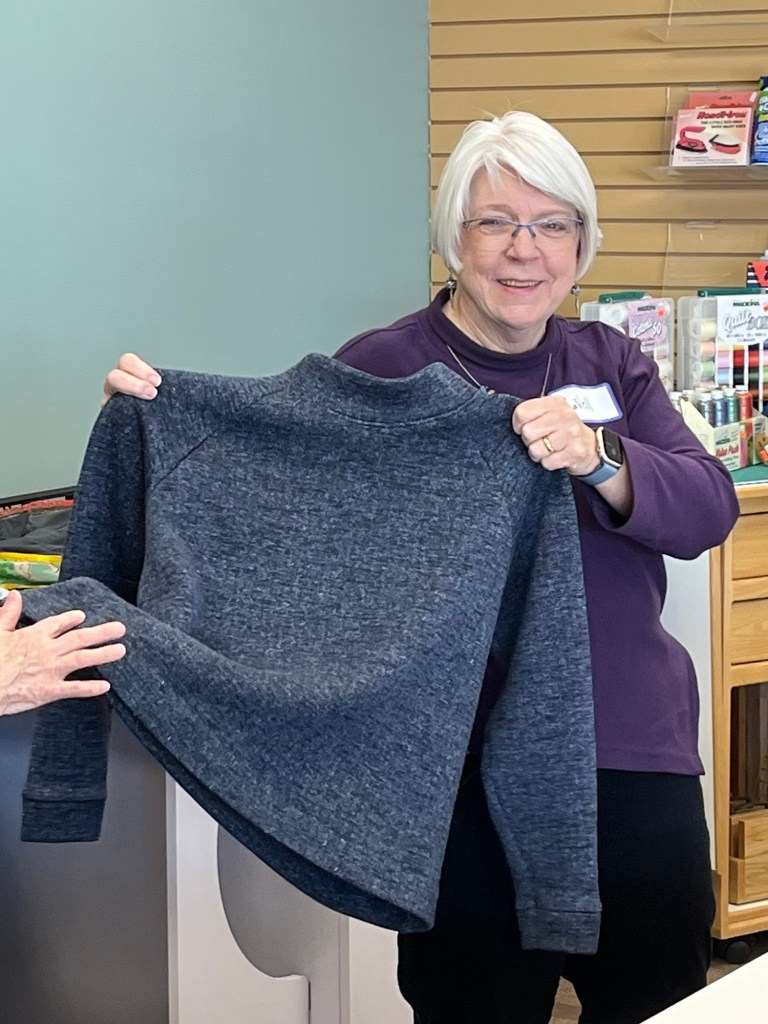
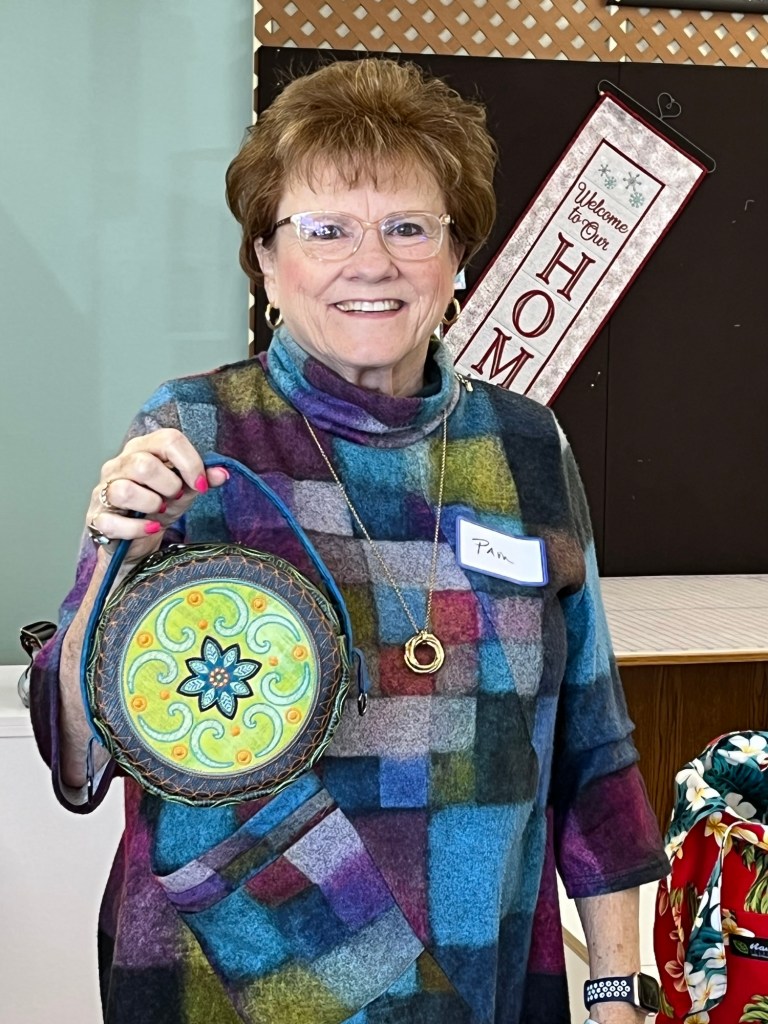
First up was progress on the Balenciaga Bog Coat-hand hemmed scarf is on table at rightRebecca introduced us (maybe I was the only one who didn’t know about them?) to the concept of Dignity QuiltsAnd then there were handmade shoes!!! Lisa WILL teach a class-watch for details-And did I mention she’s a new yaya (grandma)?This is Poised Pachyderm by The Rustic HorseshoeThe Loden Sweater by Dressmaker’s Guild-free pattern!And then there were two! Eureka Top/Sewing Workshop was used to make a few fit changesToaster Sweater in yummy (Debbie couldn’t help touching 🙂 sweater knitEmbroidered purse Sarah Bedlar patternCombined Simplicity 2289 and 8738Cashmerette Raglan Tee from Cashmerette “Ahead of the Curve”Roving reporter on Expo in Puyallup: still a lot of quilters, mixed bag on classes she took-not sure it’s worth another go